
Your trifold kit should include the pieces as shown above: Stamp mats - 1 white textured cardstock, 1 colored (colors will vary in kits) textured cardstock, and one smooth white cardstock for stamping image on; 2 black textured cardstock, 2 smooth white cardstock for stamping images on; 1 colored cardstock square and 1 white cardstock square for front closure on album; four colored die cut flowers and 1 brad for flower on front of album; 2 large white daisy die cuts, 4 small white daisy die cuts, 4 small colored daisy die cuts, and 5 pattern paper circle die cuts (only 4 shown in picture above); 5 large colored cardstock rectangle mats and 2 large pattern paper rectangle mats; 2 long colored cardstock strips and 2 long pattern paper strips; 4 short colored cardstock strips, 4 short white cardstock strips, and 8 short pattern paper strips (not shown in picture); 8 small colored cardstock squares; 2 white cardstock rectangle photo mats; 2 colored cardstock square photo mats and 2 white cardstock square photo mats.

You will also have in your kit: 2 precut trifolds, 1 large black square and 1 large black rectangle.


Fold two large black trifolds as shown in the two pictures above.

Apply glue or adhesive tape to both folded black trifold sections as shown above.

You will glue each trifold section to the large black square, lining up folded edge with outer edge of square, as shown above.

When you fold trifold back over the square you can see how the two small folded edges line up with square edge.

The trifolds should meet in the middle when adhered to the black square base. See picture below for close up.


Apply glue or adhesive to large black rectangle piece.

Adhere to middle section of album to cover up seam created by trifold, and this also adds more stability to your album.

Your trifold album is now assembled and ready to decorate. When open it should stand up like in picture above.

On inside of album adhere large colored cardstock mats to middle and both outer flaps, as shown above.

Close album and adhere other two large colored cardstock mats to outside flaps on front of album, as shown above.

Adhere two large patterned paper mats to flaps on front of album, centered on top of colored mats, as shown above.

Now you will need the two long colored cardstock strips, four short colored cardstock strips, and four short white cardstock strips, see picture above.

Adhere the colored cardstock strips as shown in picture above.

Add white cardstock strips as shown above.

Now you will adhere the 8 small colored cardstock squares (shown above) to album, see picture below for placement.

Next you will need the patterned paper mats, as shown above. (You should have 8 of the shorter patterned pieces, only 6 are shown in picture.) See picture below for placement of strips.


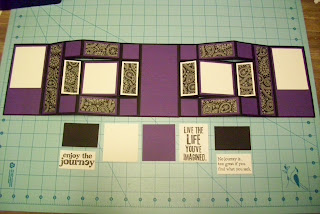
Next you will need the photo mats, as shown above; 2 white cardstock rectangles, 2 colored cardstock squares and 2 white cardstock squares.

Adhere the 2 white cardstock rectangle photo mats to top half of outer flaps, layer colored and white cardstock squares and adhere to middle section of trifold, as shown above.

Now you will need the stamp mat pieces, as shown above.

Layer larger stamp mat as shown; white on bottom, then colored cardstock, then smooth white cardstock. (Stamp your image on smooth white cardstock before adhering to stamp mat.) Adhere stamp mat to middle section, as shown above.

Layer smaller stamp mats, smooth white cardstock on top of black cardstock. (Stamp image of choice on smooth white cardstock before adhering to stamp mat.) Adhere these stamp mats to bottom half of inside outer flaps, as shown above.

Now we will need the white and colored cardstock daisy die cuts and pattern paper circles. (You will have 5 circles, only 4 shown in picture above)

Layer two cardstock daisy die cuts, alternating petals, and attach a pattern paper circle die to top of each flower. You should have one large and four small daisies, as shown above.

Attach white daisies to middle section of album, and one colored daisy to each outer flap of album, as shown in picture above.

Next we will assemble the front of the album. You will need the four flower die cuts, one brad, a piece of ribbon, and one each of colored and white cardstock squares for front flap closure.

Layer and adhere colored and white cardstock squares together, white on top. Insert brad through holes in all flower dies, largest to smallest on top, alternating petals.

Punch small hole in middle of cardstock squares with hole punch or paper piercer and stick brad through cardstock also.

Back view of cardstock square.

Apply glue or adhesive tape to half of back of cardstock square, as shown above.

Lay ribbon across closed front of album, with about 5 inches of the ribbon hanging off the right hand side.

Adhere assembled square and flower to left half of front cover over the top of the ribbon, making sure the glue is on left side panel only.

Inside view of flap after front cardstock square is attached.

Wrap ribbon around back and tie in front, trimming off any excess.

Your album is now finished!


